It will be noted that there are no Champagne bottles pictured this time... times are hard.
 Friday saw a bit of painting being done. It was that do I, or don't I moment: is it better to paint at least a basic colour before the glazing goes in, or the other way around? I decided on the former, so a basic wash of Rowney grey acrylic, letting the cream of the plastic bleed through and a few stones picked out in that crappy Spitfire green (see the Spitfire posts) and German grey. Windows were touched in with Humbrol cream letting the grey undercoat bleed a little, and doors a mix of the green and dark earth.
 Basic walls cut and opened up, the windows and door were added - from the front I may add - laying the wall over the frames one by one and dropping a dab of solvent into the corners. Easier to line up that way.
 My main deviation from the plans was to lose the twin front doors and use the end wall. The kit comes with 'front' and 'back' doors (don't go there...). So a hole 27 x 12 was hacked in and a slimmed down 'back' was set in an open position. Above this a 10x11 hole was removed at attic level and a section of one of the large windows, which were otherwise spare, was bolted behind it.
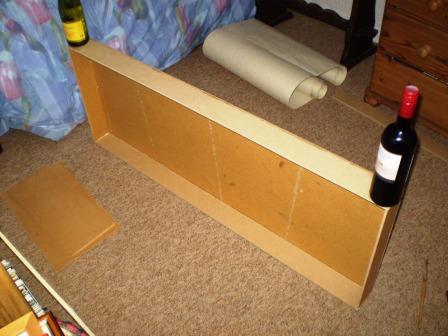
 The three main walls fixed at right angles and reinforced with the little semi-translucent strips which I took to be corner braces even though they look like something you put in your mouth when you get your teeth X-rayed. Note the chimney at one end and the Tip-ex used as a filler as I had nothing else to hand.
 As I pointed out earlier, this is not a kit as we know it. What you get in the box are several sheets of paper including some templates and very general instructions, and a bundle of the Wills building sheets and accessory packs: windows, chimneys etc. In other words while you're on your own and some experience is needed, There is an amount of choice in which way to go which you wouldn't get with a standard kit. Hence the term 'Craftsman'. I decided to deviate slightly and use the general elevation plans but alter the layout somewhat, as well as replace a few part with plain plastic. The above is obviously the two end walls and the full height (?) external chimney of which there are two recommended, but I'm only making one.
 There are two photos with the kit... both are different, but where they are alike is that it's symmetry all round; they are are the Play School house for those old enough to remember. Well that's 1. boring and 2. not very lifelike so I shuttled things around a bit.
 The roof sections were a comparative doodle. One cut to get the size, then cut and snaps for the chimney gaps, and the edges (which you can't see here) sanded to a feather edge except the top which is 45deg-ish. The bottom edge was cut into on the slate joins and a couple of broken ones cut out to relive.
 I've been given a house. Not a real one you understand, but one made of slightly soft plastic. And not even that, but a Wills Craftsman Kit of a cottage, passed to me via Mrs F. from one of her colleagues. What the hell am I going to do with that?
 It's not even a kit really, but like the old Brian Clarke 16mm kits it's some plastic sheets, a few fittings and a plan. That is you have to make most of the main parts yourself. But this didn't help me know what to do with it. Then after the B&B Members Day all the pieces dropped into place.
 1. I need a replacement for Garn ... and quickly.
 The Beds & Bucks 009 Members day was a great success; lots of chat and banter with friendly like minded souls - not unlike a certain other summer gathering. I even began peace negotiations with South Yorkshire. The catering was great, and I'm not the only one who thought that judging by the queues, and the rucksack count was low. Does this indicate something about narrow gauge modellers in that that they understand that there will be tea and toilet facilities at an exhibition and they don't need to carry the equipment from home.
 But if I do that does it qualify it as a new layout?
 Even before the blue diesels are back in the cupboard it's time to get the 009 out for the B&B Members day on Sunday at Barton le Clay just to the right of the M1. I thought Garn was a bit of a dead duck this time last year, but it's all that's going out so far with umpteen shows in the first half of the year,which means I've put off selling it until after May.
 The van was OK, but I used a paler grey than normal hoping for a lighter feel, but the body didn't come out quite the way I wanted. However the pointy wagons did. The photos I was given indicated that they are multi-purpose vehicles that can have the sides on or off and are used from anything from scrap to new timber. And, are universally filthy and covered in rust. The photo I worked from had this lovely graffiti (or is it crude route marking?) so I just copied as closely as I could using my usual palette of Humbrol and G***s W**rkshop acrylics.
 Nigel's Svanda layout needs stock to run on it and there is no shortage believe me. A selection has been picked and is down to me to dirty slightly. These are uncharted waters so I've been provided with a number of prototype photos to go with the three vehicles that I've been given. This a fairly standard (I think) NSB van from Roco that has had the couplings single-ended and some of the slop taken out of it.
 Fifteen minutes walk later and the path crosses Langstone Rd - the site of the much photographed level crossing. I'm not sure if the square building was part of the house behind or a crossing keeper's cottage. The line followed what is now the road.
 Just past this is the site of Langstone Station which sat on the right of shot. Rather a grand title for a short wooden platform and small shelter - now predictably all gone.
 A few hundred yards before Langstone Harbour the council path swings left toward the road to allow walkers to cross the road bridge leaving only the interested and knowing to scramble to the spit which carried the line to it's own bridge. Originally wooden, and then encased in concrete, which is what remains.
 With the light fading we turned and the final shot is back up toward Havant. The line split here. There was a coal wharf on the left and another on a seperate line on the right by the masts. Along with, I believe, the ramp to the short-lived paddle steamer car float to the Isle of Wight.
 The walk continues down the island, but with dropping light and tea with Cruella de Ville calling, we left it there.
  The two above cost the price of a pint and it took longer for the chap at the Hobby Box to find them in the back room than it did for me to put them together.
 The title concerns the above which was a very sensible present from Mrs. F. and purchased from the now apparently defunct Squires Tools in Bognor. So today's projects are: find some plastic for the levers, grind a point blade, examine the ruling pen and listen to the reissued Exile on Main St. to try to regain some semblance of normality.


 It was always traditional for me to wander down to the coast on New Years Day and photograph whatever was running down to Seaford, but I hadn't done it for a number of years. Today Mrs. F demanded a beach walk so the practice was a least partially resurrected.
 Today. Beer. Rhiw. Clicky. Jolyon - directed by Steve. Plaice